Tagging the primary statements - Step 2 - Apply a tag to each fact in the report section
The second step in tagging a primary statement is to apply an XBRL tag to every fact in the statement. This can be done using one of 2 methods:
- Auto-tagging
- Manual tagging
It is unlikely that the Auto-tag functionality will tag each and every fact in the statement, so it is likely a combination of both methods will be used.
Auto-tagging
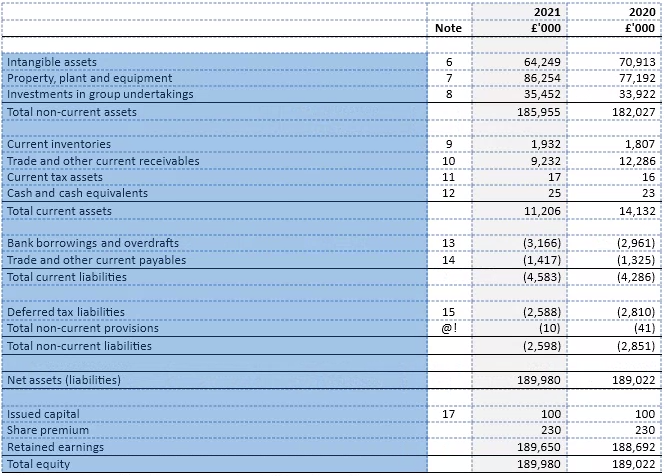
To auto-tag a table, first draw a selection down the column that contains the description of your reported facts for the first to the last row as indicated below:

Then, having selected the correct "Currently tagging:" value (Step 1), click the AutoTag Table Content button above the report:

For each row, Report Authority will attempt to find a unique appropriate tag in the taxonomy and apply it to both the current and prior period columns:

In the example above, Report Authority was able to tag all rows apart from two. For these two rows, they will need to be manually tagged.
Note column
By default, Report Authority assumes that the table contains a column for note references to the right of the column that contains the descriptions. It, therefore, skips the column to the right of the selected tag and starts tagging from the column after that.
If the primary statement you are tagging does not contain a note column and you need the software to start tagging from the column directly to the right of the description column, you must change the setting to "Table does not have note column" accessible on the bottom half of the "Insert Object(s)" button on the Home ribbon as indicated below:

Remember to change this setting back if appropriate when tagging the next primary statement.
Enhanced Auto-Tagging
The auto-tagging algorithm attempts to find a tag in the core or extended hierarchy by comparing the label in the report to the XBRL tag's label. The algorithm expects a very close match. Either an exact match, or a match beginning or ending with the label used assuming only a single match is found.
Report Authority contains the ability to enhance the auto-tagging algorithm by explicitly assigning XBRL tags to report labels used. This is especially useful in advance of the final AFSs being ready as it can reduce the amount of time to tag the document once it is ready to be converted. Further, the assignments can be exported into an Excel workbook and can be given to other stakeholders such as auditors to review in advance of the tagging work commencing.
To access the enhanced Auto-tag table, click the Refine AutoTag button:

This will unhide and activate the AutoTag panel:

The currently tagging combobox in this panel is synchronised with the currently tagging combobox in the Report panel. Changing it in either panel will change it in the other.
Adding report labels to the AutoTag table
To add report labels to the AutoTag table:
- Change the currently tagging role to the appropriate primary statement.
- Draw a selection over the labels in the table
- Right-click the selection and select AutoTag -> Add Report Labels to AutoTag Table, or click the Add Report Labels to AutoTag Table button in the AutoTag panel. Please note this option will be disabled if the currently tagging role is 010 - the mandatory tags and disclosure notes (Autotag cannot be used for text tags).

As seen in the screenshot above, Report Authority will use the standard auto tag algorithm to suggest the appropriate tag. If the tag suggested is not appropriate, or no match is found, the tag can be changed, or assigned by simply dragging a tag (core or extended) from the Primary Tags panel and dropping it onto the row.
Furthermore, if the label is not currently in the report, it can be added manually by clicking on the bottom bar.
Reverse Signage
If the signage of the tag will need to be reversed, you can put a checkmark in the final column. When applying auto tag, Report Authority will automatically reverse the sign of the tag after it is applied.
Using the enhanced Autotag data
Now, when you apply the Autotag functionality as described at the beginning of the article, Report Authority will first attempt to match the tags by looking at the enhanced auto-tag data before it resorts to the generic algorithm.
When you create a new document - for example when the AFSs are finalised, if you import the extended taxonomy from the document you used for preparation, Report Authority will import the Autotag data, too.
Manual Tagging
Searching for an appropriate tag
To manually tag a row, you first need to search for an appropriate tag in the core taxonomy. This article deals in detail with the searching for primary tags. As a summary in the context of ESEF reporting:
You can highlight a keyword in the primary statements, right-click, and ask Report Authority to suggest appropriate tags:

In this example, it will initiate a search in the Core ESEF taxonomy for a tag containing the word "investments" - ether in the visible label or in the ID of the tag:

Using the up and down arrow, you can skip to each match in the taxonomy. Skip over the yellow text tags and only consider the blue monetary tags.
The search terms can be refined using only the stems of the key concepts in any order. For example, you can input "sub inv" to search for any tag that might have investments and subsidiaries in the name:

Notice that a search for "sub inv" returns a shorter list of matches (34) than the search term for "investments" which returns 146 matches.
Please note that you must search the entire core taxonomy for an appropriate tag - not just the sections that correspond to the primary statements.
If you cannot find an appropriate tag, you must create an extended tag directly in your extended taxonomy. See the article Extending the core taxonomy - Creating a new tag for how to do this.
Applying the tag
Once you have found an appropriate tag (or created an extended tag), this must be applied to its relevant facts in the document.
Please refer to this article for more information on how to apply a numeric tag to the document.
To summarise this article in the context of tagging a document for ESEF purposes, here is a short video demonstrating how to manually tag a primary statement that has two columns, one for the current period, and one for the prior period, such as a statement of financial position, a statement of comprehensive income or a statement of cash flows: